Aesthetics andtime reduction:a win-winscenario

Aesthetics andtime reduction:a win-winscenario

CASE 1: mandibular fixed denture

Fig. A1: The zirconia framework with vestibular micro-reduction in the anterior region (0.5 mm for the teeth and 0.6 mm for the gingiva). It is important to make sure that the structure is thoroughly cleaned before starting the internal staining with Lustre Pastes ONE. The structure was sandblasted at low pressure, thereby following the instructions for use.

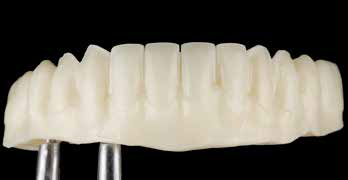
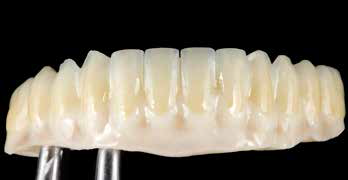
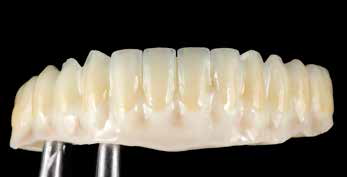
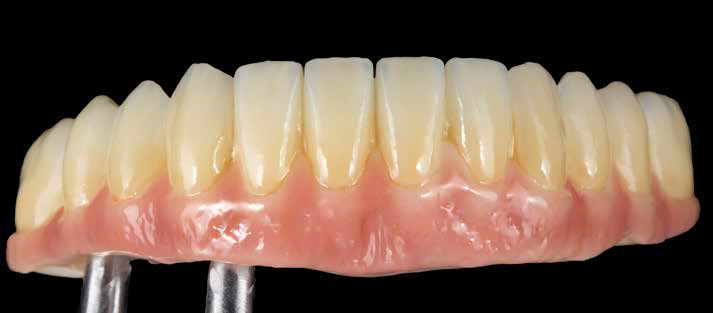
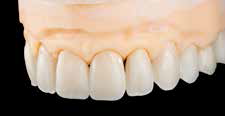
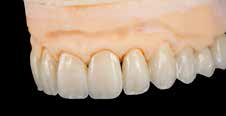
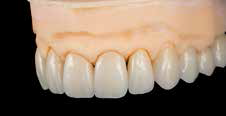
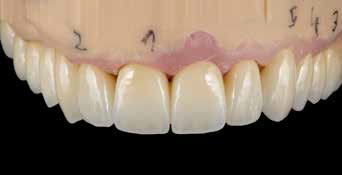
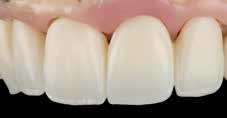
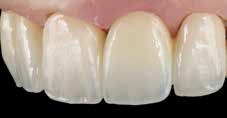
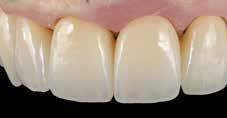
Fig. A2: L-NFL (Neutral Fluorescent) was applied on all teeth. In the cervical area, a colour and saturation gradient was created with L-A and L-B; For the body of the tooth, L-3 and L-10 were used; for the mamelons, L-1, L-V, L-N and L-B were combined; the incisal area framing the mamelons was made using L-6 and L-3.
Fig. A3: On the gingival area, thin layer of L-N (without fluorescence) was applied. To create depth in the tissue, SPS-11 and SPS-17 were used; veins were created with SPS-11 and highlights were added with SPS-19. After firing, we sandblasted at very low pressure (0.8-1 bar) at a distance of approximately 10 cm to remove the gloss effect and to create additional mechanical retention for the subsequent layer of SQIN ceramics.
Fig. A4: Final result after firing with BodyA + Enamel E-58 on the teeth and Gingiva Dark + GUM Light + GUM Neutral in the gingival area. The morphology of the teeth and soft tissues was sculpted with a brush, including the “orange peel effect”. The interproximal areas were stained with SPS-14 to give more depth and a natural effect.
Fig. A5: End result: “Highly aesthetic and with a fascinating reduction in working hours”
CASE 2: maxillary crowns
Fig. B1: The monolithic crowns with micro-reduced anterior teeth in white zirconia.
Fig. B2: With the Lustre Pastes ONE, chromatic areas, zones of light reflection and absorption, mamelons and other fine details of the natural tooth, are truthfully recreated.
Fig. B3: After application of SQIN on the anterior teeth. The Form and Texture Liquid offers an astounding plasticity in the ceramic when the details of each tooth are modelled with the brush. What we paint and model is what we actually see after firing, and this gives us a satisfying control.
CASE 3: maxillary restorations
Fig. C1: All restorations, before and after characterization, front view. A micro-reduction was applied up to the first premolar, while the posterior teeth were kept purely monolithic. The anterior micro-layered and posterior monolithic teeth form a beautiful harmony and show natural opalescence and fluorescence.
Fig. C2: Closeup of the zirconia framework (slightly oblique view) with micro-reduction up to the first premolar.
Fig. C3: After application of Lustre Pastes ONE. The transparency effect in the incisal margin looks remarkably realistic.
Fig. C4: After application of SQIN. Notice the fine details in the surface structure, immediately created in the wet stage. Due to the auto-glaze effect, an additional glaze firing is not necessary.
CONCLUSION

When we consider that materials like zirconium and lithium disilicate have little to no fluorescence, this system offers us the capacity to recreate the natural fluorescence of a tooth.

Meanwhile, the intensity of every effect, colour as well as texture, can be accurately controlled. All of this can be done following a reproducible work protocol,

each time guaranteeing the optimal and highly aesthetic result we are all striving for.

Given the little amount of ceramics needed, the self-glazing effect, the infinite shade effects and the control that is provided because of the well-balanced properties of each component, it’s safe to say that ONE SQIN is the ultimate system for the modern lab.

Si te ha gustado, compartelo.